
1. Containers
Containers are replacing the role of a piece of land in container gardening. Choosing good-quality, affordable, and suitable containers makes the journey much easier. When it comes to the best containers for plants, the material matters. Most gardeners go for plastic pots because they are widely available, budget-friendly, and lightweight.
For beginners, plastic is a great option to start with. But if you’re more concerned about sustainability and pot materials, you can start with terracotta or mud pots. Terracotta pots are usually available in local nurseries, and it’s a bit rare to find these pots online.
Apart from these, there are other options like concrete pots (usually found in local plant shops), grow bags, and fibre pots. If you’re into decorative gardening, ceramic and metal pots add an aesthetic touch. Now, if you’re someone who doesn’t want to spend on pots in the beginning, no worries — DIY plant pots are your go-to. Household containers like large plastic boxes, unused kitchen containers, protein powder jars, and takeout containers can all be recycled into cheap plant containers.
Whatever the container — expensive or recycled — one must-have feature is drainage holes. This little detail prevents waterlogging, overwatering, soil-borne diseases, and foul smells in the potting mix, and keeps the roots well-aerated.
There’s also a myth out there — that a bigger pot means bigger plant growth. That’s a big no. You should choose pots based on the size of the root ball, not the plant’s height. The pot should be about two inches bigger than the root ball. For example, a 4-inch potted plant should be moved to a 6-inch pot for healthy growth. You can always upgrade once you notice root crowding.
 Want to know which pots actually make a difference? Read my guide on the 6 best pots for container gardening and discover tried-and-tested tips.
The potting mix is the lifeline of your plants. It needs to be light, aerated, and filled with the right nutrients. A good container soil recipe holds moisture without getting compact and gives space for roots, water, and oxygen to move freely.
Avoid using garden soil or red soil alone in containers — it’s too heavy, compacted, and can carry soil-borne diseases. For a successful garden, your soil must be structured for containers.
My go-to DIY potting mix includes cocopeat instead of red or garden soil. Cocopeat is lightweight, holds moisture, and is perfect for terraces, balconies, or hanging pots. But cocopeat alone isn’t enough — it acts more like a sponge. You need to add compost and manure to make the mix nutrient-rich.
If you really want to add some soil, make sure it’s sterilized and combine it with well-aged compost or manure. A basic potting mix should have: cocopeat + compost + manure. For extra aeration, you can add coconut husk chips, perlite, or vermiculite.
If you have a busy lifestyle and prefer a ready-made mix, I usually recommend avoiding it. Ready-made mixes are expensive, and you never know exactly what’s in them. Instead of buying a 25kg potting mix for ₹800–₹1000, buy ingredients separately:
- Cocopeat block (5kg)
- Compost (10kg)
- Manure (10kg)
- Perlite (2kg)
- Vermiculite (1kg)
- Coconut husk block (5kg)
This combo costs about the same but gives you almost 70kg worth of quality potting mix — much more value and control.
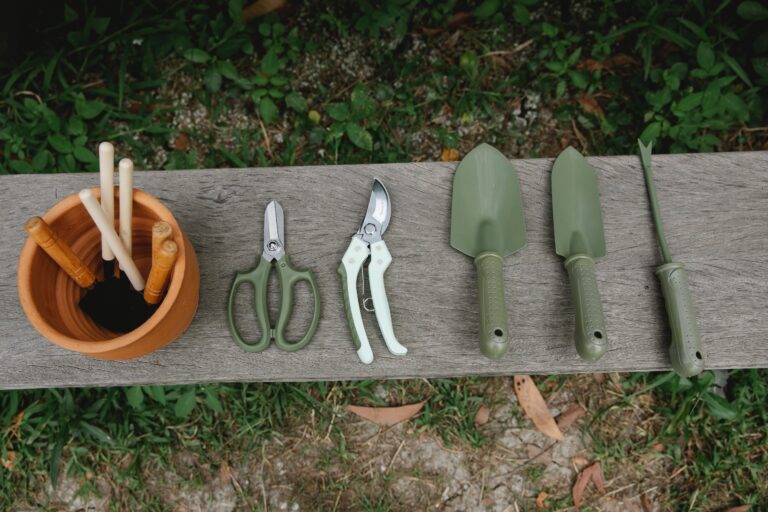
3. Basic Tools
I usually go for a basic gardening toolkit that includes a trowel, hand fork, hard rake, pruners, garden gloves, and scissors. These tools cover most of your daily gardening needs.
A trowel is super useful for filling soil, transplanting saplings, and mixing potting mix. The hand rake and hand-fork are perfect for loosening soil and removing weeds. Pruners help in cutting dead parts, which saves the plant’s energy and keeps it looking neat. I use these pruners and scissors for all kinds of cutting work.
Gloves are essential too — they protect your hands from skin irritation, thorny plants, and small insect bites in the soil. One tool I started using recently and highly recommend is a gardening mat. It’s such a simple tool, but it prevents a mess. You can place it on a table, do your garden work, and just clean the mat afterwards.
Essential gardening tools like these make a huge difference, especially for beginners. They help you stay organised, reduce mess, and make gardening more enjoyable.
This is a super important part, especially when it comes to gardening in small spaces like balconies or corridors. Before you buy any plant, you need to understand the sunlight your space gets. I’ve made this mistake a lot. I’ve bought so many of my favourite plants without checking the light conditions, only to see them burn under full sun or wilt in full shade.
Every plant has different sunlight needs. Some need full sun, others prefer indirect light. So, before buying, make a list of plants you love and check their light preferences. Then compare that with your space.
Here’s how to check your sunlight exposure: take photos of your space every hour from sunrise to sunset. Note how many hours of light the space gets and how intense it is. This gives you a clear picture of where each plant should go.
 To make this whole process easier, grab my Customised Gardening Planner – designed to track everything from sunlight and watering to fertilising potting mix, and pruning.
 Available on Amazon KDP (US/UK) — international buyers (including India) can order via Amazon Global Store. Shipping charges and delivery time may vary.
Get it here
Once you’ve sorted sunlight, the next big thing is space. If you have a larger ground area, you can go for big plants in big containers. But if you’re gardening on a terrace or balcony, avoid heavy plants and pots — they add too much load.
Also, overcrowding with large or vining plants in small areas only creates clutter. Buy plants according to your available space. For terraces, plants that grow up to 3 ft are manageable. For balconies or indoor spaces, I prefer plants under 2 ft — and if it’s a vining plant, just keep it in shape.
Maximise small areas with balcony gardening tricks like:
These methods are perfect for any container garden setup and help you grow more without using extra floor space.

The list of plants below may seem extensive, but I am providing options in various categories. You can choose a mix of different types or focus on one specific type of garden, such as a vegetable garden or kitchen garden. Familiarising yourself with these plants will help you expand your ideas regarding your gardening options.
 1. Vegetables
Tomato
Sunlight: 6–8 hrs (Full Sun)
Soil: Loamy, rich in compost
Watering: 2–3 times/week
Fertiliser: Compost biweekly
Pruning: Remove suckers
Brinjal (Eggplant)
Sunlight: 6–8 hrs
Soil: Well-drained loamy
Watering: Every 2–3 days
Fertiliser: Organic compost monthly
Pruning: Trim older leaves
Chilli
Sunlight: 5–6 hrs
Soil: Sandy loam
Watering: Every 2–3 days
Fertiliser: Cow dung monthly
Pruning: Remove dry stems
Okra (Lady Finger)
Sunlight: 6–8 hrs
Soil: Loamy, slightly sandy
Watering: Every 2 days
Fertiliser: Neem cake + compost
Pruning: Remove old leaves
Radish
Sunlight: 4–6 hrs
Soil: Loose, well-drained
Watering: Daily light watering
Fertiliser: Compost once in 10 days
Pruning: Not required
 2. Leafy Vegetables
Spinach (Palak)
Sunlight: 4–6 hrs
Soil: Rich, moist, loamy
Watering: Daily
Fertiliser: Vermicompost biweekly
Pruning: Harvest leaves
Methi (Fenugreek)
Sunlight: 4–5 hrs
Soil: Well-drained with compost
Watering: Daily light
Fertiliser: Compost every 2 weeks
Pruning: Cut mature leaves
Amaranth
Sunlight: 4–6 hrs
Soil: Light, fertile
Watering: Every 2 days
Fertiliser: Organic fertiliser
Pruning: Harvest tops
Lettuce
Sunlight: 3–5 hrs
Soil: Moist, rich
Watering: Daily, shallow
Fertiliser: Compost monthly
Pruning: Trim outer leaves
Mustard Greens
Sunlight: 4–5 hrs
Soil: Loamy, fertile
Watering: Keep the soil moist
Fertiliser: Compost monthly
Pruning: Harvest when young
 3. Herbs
Mint (Pudina)
Sunlight: 3–4 hrs
Soil: Moist, rich
Watering: Daily or alternate days
Fertiliser: Compost monthly
Pruning: Trim tops often
Basil (Tulsi)
Sunlight: 5–6 hrs
Soil: Loamy, well-drained
Watering: Every 2–3 days
Fertiliser: Cow dung compost
Pruning: Pinch flowers
Coriander (Dhaniya)
Sunlight: 3–5 hrs
Soil: Well-drained sandy
Watering: Light daily
Fertiliser: Light compost
Pruning: Trim from the top
Thyme
Sunlight: 4–6 hrs
Soil: Sandy, well-drained
Watering: 2–3 times/week
Fertiliser: Mild liquid fertiliser
Pruning: Trim regularly
Oregano
Sunlight: 5–6 hrs
Soil: Light, dry
Watering: Once or twice/week
Fertiliser: Occasional compost
Pruning: Pinch back tips
 4. Flowers
Marigold
Sunlight: 5–6 hrs
Soil: Sandy, well-drained
Watering: Every 2–3 days
Fertiliser: Flower fertiliser monthly
Pruning: Deadhead spent blooms
Petunia
Sunlight: 5–6 hrs
Soil: Loamy, well-drained
Watering: 2–3 times/week
Fertiliser: Compost every 2 weeks
Pruning: Trim leggy stems
Periwinkle (Sadabahar)
Sunlight: 4–6 hrs
Soil: Sandy loam
Watering: Every 2–3 days
Fertiliser: Low-nitrogen compost
Pruning: Remove dry flowers
Zinnia
Sunlight: 6 hrs
Soil: Light, loamy
Watering: 2–3 times/week
Fertiliser: Organic fertiliser
Pruning: Deadhead regularly
Chrysanthemum
Sunlight: 5–6 hrs
Soil: Loamy, well-drained
Watering: 2–3 times/week
Fertiliser: Flower fertiliser
Pruning: Pinch early buds
 5. Fruits (Dwarf/Container Varieties)
Lemon (Dwarf)
Sunlight: 6–8 hrs
Soil: Sandy loam with compost
Watering: 2 times/week
Fertiliser: Organic citrus mix
Pruning: Trim after fruiting
Strawberry
Sunlight: 4–6 hrs
Soil: Slightly acidic loam
Watering: Daily light
Fertiliser: Banana peel compost
Pruning: Trim runners
Guava (Dwarf)
Sunlight: 6–8 hrs
Soil: Well-drained, compost-rich
Watering: 2 times/week
Fertiliser: Organic mix monthly
Pruning: Thin inner branches
Papaya (Dwarf)
Sunlight: 6+ hrs
Soil: Loamy, fertile
Watering: Every 2 days
Fertiliser: Cow dung compost monthly
Pruning: Trim broken branches
Fig (Dwarf)
Sunlight: 5–7 hrs
Soil: Loamy + organic mix
Watering: Weekly deep watering
Fertiliser: Mild compost monthly
Pruning: Yearly in dormancy
 6. Climbers & Creepers
Beans
Sunlight: 5–6 hrs
Soil: Loamy, fertile
Watering: Every 2 days
Fertiliser: Compost every 15 days
Pruning: Remove dried vines
Bitter Gourd
Sunlight: 5–6 hrs
Soil: Sandy loam
Watering: 2–3 times/week
Fertiliser: Cow dung monthly
Pruning: Trim side shoots
Ridge Gourd
Sunlight: 6+ hrs
Soil: Moist, rich
Watering: Every 2 days
Fertiliser: Neem cake + compost
Pruning: Prune secondary vines
Red Pumpkin
Sunlight: 6+ hrs
Soil: Loose, fertile
Watering: 2–3 times/week
Fertiliser: Organic compost
Pruning: Pinch tips early
Cucumber
Sunlight: 5–6 hrs
Soil: Sandy loam
Watering: Daily in summer
Fertiliser: Potassium-rich compost
Pruning: Remove yellow leaves
 7. Succulents
Aloe Vera
Sunlight: 4–6 hrs
Soil: Sandy, well-drained
Watering: Once a week
Fertiliser: Light monthly
Pruning: Remove old leaves
Jade Plant
Sunlight: 4–6 hrs
Soil: Sandy, gritty
Watering: 1–2 times/week
Fertiliser: Monthly cactus feed
Pruning: Shape occasionally
Echeveria
Sunlight: Bright indirect
Soil: Cactus/succulent mix
Watering: Once a week
Fertiliser: Minimal
Pruning: Remove old leaves
Haworthia
Sunlight: Indirect
Soil: Gritty, well-drained
Watering: Every 10–12 days
Fertiliser: Rarely needed
Pruning: Minimal
Cactus
Sunlight: Full or indirect
Soil: Sandy mix
Watering: Once in 10 days
Fertiliser: Mild cactus feed
Pruning: Only damaged stems
 8. Indoor Foliage
Snake Plant
Sunlight: Indirect
Soil: Sandy, well-drained
Watering: Weekly
Fertiliser: Mild monthly
Pruning: Trim dry leaves
ZZ Plant
Sunlight: Indirect to low
Soil: Well-drained loamy
Watering: Every 10–12 days
Fertiliser: Rare
Pruning: Wipe leaves
Spider Plant
Sunlight: Bright indirect
Soil: Well-drained
Watering: 2–3 times/week
Fertiliser: Monthly liquid feed
Pruning: Trim brown tips
Peace Lily
Sunlight: Indirect
Soil: Moist, rich
Watering: Keep moist
Fertiliser: Flower feed monthly
Pruning: Remove dry blooms
Pothos (Money Plant)
Sunlight: Indirect
Soil: Loose, rich
Watering: 2–3 times/week
Fertiliser: Compost every 2 weeks
Pruning: Pinch tips
 9. Outdoor Foliage
Areca Palm
Sunlight: Partial to full
Soil: Sandy, well-drained
Watering: Every 2–3 days
Fertiliser: Compost every 2 months
Pruning: Trim brown fronds
Rubber Plant
Sunlight: Indirect/full
Soil: Loamy
Watering: 1–2 times/week
Fertiliser: Monthly liquid feed
Pruning: Trim for size
Croton
Sunlight: 4–5 hrs
Soil: Rich, well-drained
Watering: Every 2–3 days
Fertiliser: Compost monthly
Pruning: Cut leggy branches
Bougainvillea
Sunlight: Full
Soil: Sandy, dry
Watering: Every 3–4 days
Fertiliser: Low nitrogen
Pruning: Hard prune post-flowering
Hibiscus
Sunlight: Full to partial
Soil: Loamy, fertile
Watering: Daily in summer
Fertilizer: Compost + potassium
Pruning: Trim regularly
Why are these forgiving for new gardeners?
The above-listed plants are tolerant of overwatering and inconsistent care, not only beginner-friendly, but also suitable for people like me who buffer in my thoughts and forget my plants’ existence sometimes. These are some of thick thick-leaved plants that are drought-tolerant as well, they can survive underwatering as well.
The listed plants have completely come under the low-maintenance segment. Basic sunlight, watering and adding compost in potting mix keep these plants alive and thriving if you are just mindful about water and sunlight needs.
The leafy greens, microgreens, herbs and flowers are quick bloom and growing varieties that motivate new gardeners with some quick harvests and gratification of gardening. Most of the veggies, leafy greens, herbs, foliage and succulents fit perfectly in pots and grow bags.
These plants have natural resistance to common pests and diseases, which gives the beginner gardener an advantage to skip the pest and disease treatments. Along with that, these plants are easy to propagate and you can use them to multiple or experiment with your gardening skills.
Also, these plants can be maintained with the basic gardening tools we mentioned earlier, there is no need for any special tools.


